Welcome to the reopening of my website! Here, I’ll share my thoughts, tutorials, and various interesting topics I come across. Updates may not be regular, but I hope you find the content useful or entertaining. Thank you for visiting!
If you’re interested in creating your own website like this, I’ve prepared a tutorial for you below. Enjoy!
The tutorial
Installing HUGO
Remember you need to install Git and GO beforehand!
Link: https://gohugo.io/installation/
Create a new site
## Setting up the site
hugo new site examplesite --format yaml

cd examplesite
Setting up GitHub
- Create an account, then create a repository
Authenticate yourself
- How to authenticate yourself: https://docs.github.com/en/authentication/connecting-to-github-with-ssh
## Initialize the repository
## Make sure you are in your website directory
git init
Downloading a theme
You can find themes here: https://themes.gohugo.io/
Pro tip: Most themes have extensive documentation and example configurations. Always check the theme’s documentation for specific setup instructions.
## Installing theme
git submodule add https://github.com/adityatelange/hugo-PaperMod.git themes/PaperMod
Configuring HUGO
- Most themes have an example configuration you can use. Using the theme’s example config is recommended to ensure everything works correctly.
- We will edit the hugo.yaml file. You can use any text editor:
- VS Code (Recommended):
code hugo.yaml - Notepad (Windows):
notepad hugo.yaml - Nano (Mac/Linux):
nano hugo.yaml
- VS Code (Recommended):
EXPAND - Configuration file (hugo.yaml)
baseURL: "https://examplesite.com/"
title: ExampleSite
paginate: 5
theme: PaperMod

enableRobotsTXT: true
buildDrafts: false
buildFuture: false
buildExpired: false

googleAnalytics: UA-123-45

minify:
  disableXML: true
  minifyOutput: true

params:
  env: production # to enable google analytics, opengraph, twitter-cards and schema.
  title: ExampleSite
  description: "ExampleSite description"
  keywords: [Blog, Portfolio, PaperMod]
  author: Me
  # author: ["Me", "You"] # multiple authors
  images: ["<link or path of image for opengraph, twitter-cards>"]
  DateFormat: "January 2, 2006"
  defaultTheme: auto # dark, light
  disableThemeToggle: false

  ShowReadingTime: true
  ShowShareButtons: true
  ShowPostNavLinks: true
  ShowBreadCrumbs: true
  ShowCodeCopyButtons: false
  ShowWordCount: true
  ShowRssButtonInSectionTermList: true
  UseHugoToc: true
  disableSpecial1stPost: false
  disableScrollToTop: false
  comments: false
  hidemeta: false
  hideSummary: false
  showtoc: false
  tocopen: false

  assets:
    # disableHLJS: true # to disable highlight.js
    # disableFingerprinting: true
    favicon: "<link / abs url>"
    favicon16x16: "<link / abs url>"
    favicon32x32: "<link / abs url>"
    apple_touch_icon: "<link / abs url>"
    safari_pinned_tab: "<link / abs url>"

  label:
    text: "Home"
    icon: /apple-touch-icon.png
    iconHeight: 35

  # profile-mode
  profileMode:
    enabled: false # needs to be explicitly set
    title: ExampleSite
    subtitle: "This is subtitle"
    imageUrl: "<img location>"
    imageWidth: 120
    imageHeight: 120
    imageTitle: my image
    buttons:
      - name: Posts
        url: posts
      - name: Tags
        url: tags

  # home-info mode
  homeInfoParams:
    Title: "Hi there 👋"
    Content: Welcome to my blog

  socialIcons:
    - name: x
      url: "https://x.com/"
    - name: stackoverflow
      url: "https://stackoverflow.com"
    - name: github
      url: "https://github.com/"

  analytics:
    google:
      SiteVerificationTag: "XYZabc"
    bing:
      SiteVerificationTag: "XYZabc"
    yandex:
      SiteVerificationTag: "XYZabc"

  cover:
    hidden: true # hide everywhere but not in structured data
    hiddenInList: true # hide on list pages and home
    hiddenInSingle: true # hide on single page

  editPost:
    URL: "https://github.com/<path_to_repo>/content"
    Text: "Suggest Changes" # edit text
    appendFilePath: true # to append file path to Edit link

  # for search
  # https://fusejs.io/api/options.html
  fuseOpts:
    isCaseSensitive: false
    shouldSort: true
    location: 0
    distance: 1000
    threshold: 0.4
    minMatchCharLength: 0
    limit: 10 # refer: https://www.fusejs.io/api/methods.html#search
    keys: ["title", "permalink", "summary", "content"]
menu:
  main:
    - identifier: categories
      name: categories
      url: /categories/
      weight: 10
    - identifier: tags
      name: tags
      url: /tags/
      weight: 20
    - identifier: example
      name: example.org
      url: https://example.org
      weight: 30
# Read: https://github.com/adityatelange/hugo-PaperMod/wiki/FAQs#using-hugos-syntax-highlighter-chroma
pygmentsUseClasses: true
markup:
  highlight:
    noClasses: false
    # anchorLineNos: true
    # codeFences: true
    # guessSyntax: true
    # lineNos: true
    # style: monokai
Testing HUGO
Before creating content, let’s verify that HUGO works with your theme:
## Test the server
hugo server -t PaperMod

## Your site will be available at http://localhost:1313
Creating posts
To create your first post, you can use Hugo’s built-in command or create the file manually in your content directory.
Using Hugo’s command:
hugo new posts/my-first-post.md
Or create a file manually in content/posts/my-first-post.md with this template:
---
title: "My First Post"
date: 2025-02-12
tags: ["blog"]
draft: false
showToc: true
---

## Your Content Goes Here

Write your post content using Markdown formatting.

### Subheading Example

- You can use bullet points
- Add code blocks
- Include images
- And more!
Some key points about posts:
- Files are created in the
content/posts/directory. - Front matter (the section between
---) contains metadata about your post. - Set
draft: falsewhen you’re ready to publish. - Use Markdown formatting for the content.
- Images can be placed in the
staticfolder and referenced in your posts.
To see your new post, run the Hugo server again:
hugo server
If you want to publish your post to GitHub use this build script below.
Build script
This PowerShell script will:
- Build your Hugo site
- Commit any changes to the master branch
EXPAND - PowerShell (Windows)
# Set error handling
$ErrorActionPreference = "Stop"
Set-StrictMode -Version Latest

# Error handling and logging
function Write-StatusMessage {
    param(
        [string]$Message,
        [string]$Type = "Info"
    )
    $timestamp = Get-Date -Format "dd-MM-yyyy HH:mm"
    switch ($Type) {
        "Info"  { Write-Host "[$timestamp] INFO: $Message" -ForegroundColor Cyan }
        "Error" { Write-Host "[$timestamp] ERROR: $Message" -ForegroundColor Red }
        "Success" { Write-Host "[$timestamp] SUCCESS: $Message" -ForegroundColor Green }
    }
}

# Change to the script's directory
$ScriptDir = Split-Path -Parent $MyInvocation.MyCommand.Definition
Set-Location $ScriptDir

# Function to handle Git operations with error checking
function Invoke-GitCommand {
    param(
        [string[]]$Command,
        [string]$ErrorMessage
    )
    try {
        $output = & git $Command
        return $output
    }
    catch {
        Write-StatusMessage $ErrorMessage "Error"
        exit 1
    }
}

# Step 1: Build the Hugo site
Write-StatusMessage "Building the Hugo site..."
try {
    $hugoOutput = hugo
    if ($LASTEXITCODE -ne 0) { throw "Hugo build failed" }
} catch {
    Write-StatusMessage "Hugo build failed: $_" "Error"
    exit 1
}

# Step 2 & 3: Git operations
Write-StatusMessage "Checking Git status..."
$hasChanges = (Invoke-GitCommand @("status", "--porcelain")) -ne ""

if ($hasChanges) {
    Write-StatusMessage "Changes detected, staging files..."
    Invoke-GitCommand @("add", ".") "Failed to stage changes"

    $hasStagedChanges = (Invoke-GitCommand @("diff", "--cached", "--name-only")) -ne ""
    if ($hasStagedChanges) {
        $timestamp = Get-Date -Format "yyyy-MM-dd HH:mm"
        $commitMessage = "Site updated at $timestamp"
        Write-StatusMessage "Committing changes..."
        Invoke-GitCommand @("commit", "-m", $commitMessage) "Failed to commit changes"
    }
} else {
    Write-StatusMessage "No changes detected"
}

# Step 4: Push to master
Write-StatusMessage "Deploying to GitHub Master..."
Invoke-GitCommand @("push", "origin", "master") "Failed to push to Master branch"

Write-StatusMessage "Deployment completed successfully!" "Success"
EXPAND - Bash (Mac/Linux)
Script is in the works, you can open a pull request with a bash script if you want to help me.
Deploying w/Vercel
To deploy your website to Vercel, follow these steps:
- Create a Vercel Account:
- Go to https://vercel.com/ and sign up for an account if you don’t already have one.
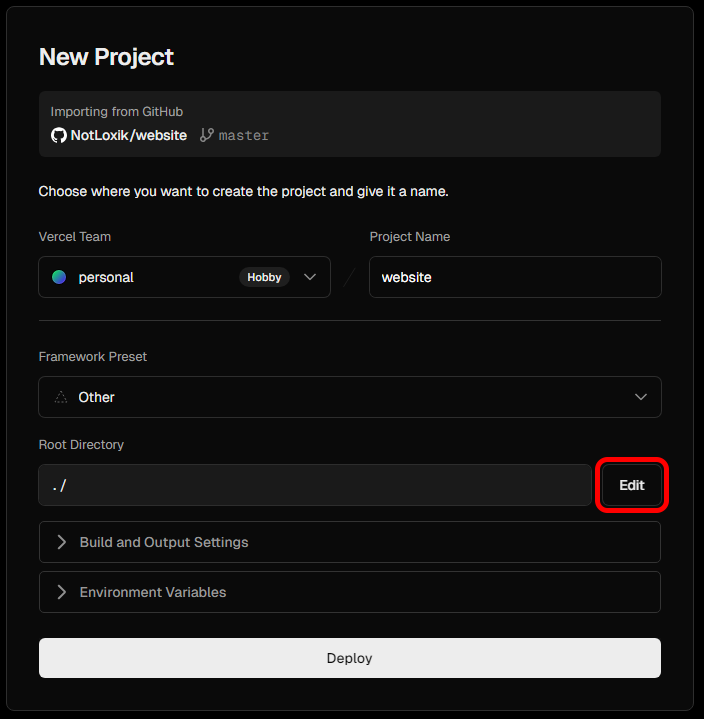
- Import Your Project:
- After logging in, in the Vercel dashboard click on the “Add New…” -> “Project”, this will lead you to a creation screen.
- Select “Import Git Repository” and connect your GitHub account.
- Choose the repository that contains your website project.
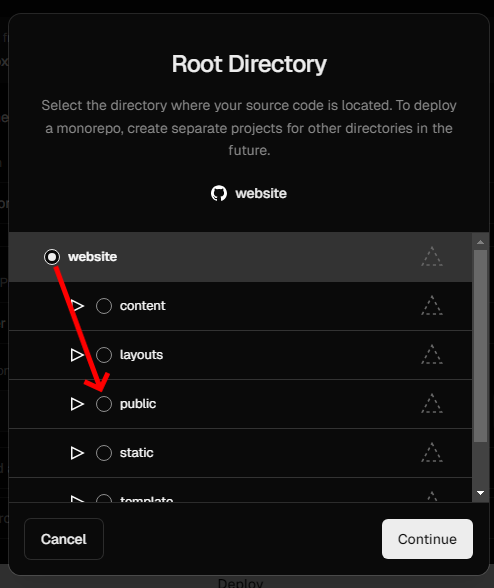
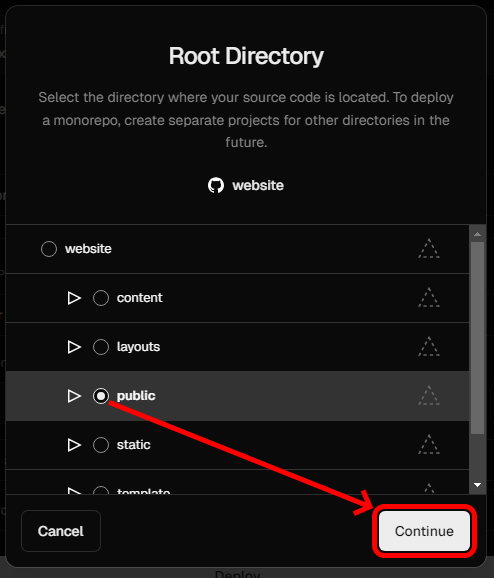
- Set the “Root Directory” to
public.
EXPAND - Image Guide
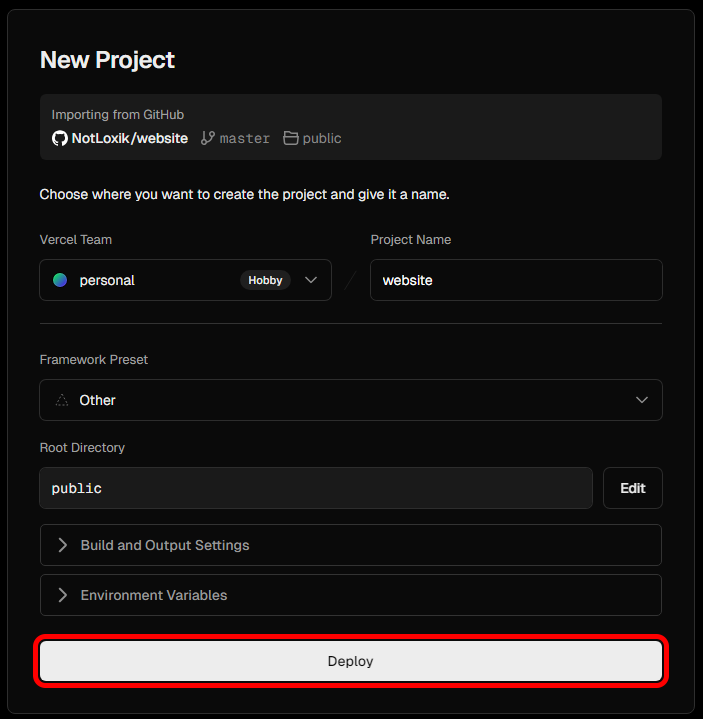
- Deploy Your Site:
- Click on the “Deploy” button to start the deployment process.
Your website is now set up and will deploy automatically to Vercel whenever you run the build script. I hope this tutorial helped you, if you encountered any issues reach out in the comments section down below. Enjoy your newly set up website!